Getting curtain measurements right is the single most important step before ordering. Too narrow and you will have gaps at the edges and a cluttered stack when open. Too short and the room looks unfinished. Too long and the hem drags on the floor or collects dust.
The good news: accurate measuring does not require a professional. By working in millimetres and following the steps below, you can achieve a perfect result — whether you are ordering made-to-measure curtains or booking a consultation.
Before You Measure: Decide Where Your Track Will Sit
Before picking up your tape measure, you need to decide whether your track or rod will mount inside the window recess or outside (above and beyond the frame). This affects every measurement you take.
Our recommendation: Mount outside and above the window frame (the architrave) for most rooms. Installing your track 100–150mm above the frame draws the eye upward, creates a sense of height, and maximises insulation when the curtains are closed.
Mounting outside the frame also allows curtains to stack completely clear of the glass when open — letting in full natural light rather than partially blocking it.
💡 Auckland tip: In older villas and bungalows, windows often sit close to internal joinery, walls, or built-in cabinetry. Before finalising your track extension, check for obstructions on both sides — heat pumps, architraves, and built-in wardrobes are the most common issues.
What You Will Need Before You Start
- Heavy-duty metal tape measure — fabric tapes stretch and will skew your numbers. Always use metal.
- Pencil and paper or phone notes — record every measurement immediately, do not rely on memory
- Step stool or ladder — for safely reaching high tracks or ceiling-mounted rods
- Existing track or rod (if installed) — always measure the track itself, not the wall or window frame
- Confirmed curtain style — decide whether you want a single panel or a pair, as this affects how you calculate width and overlap
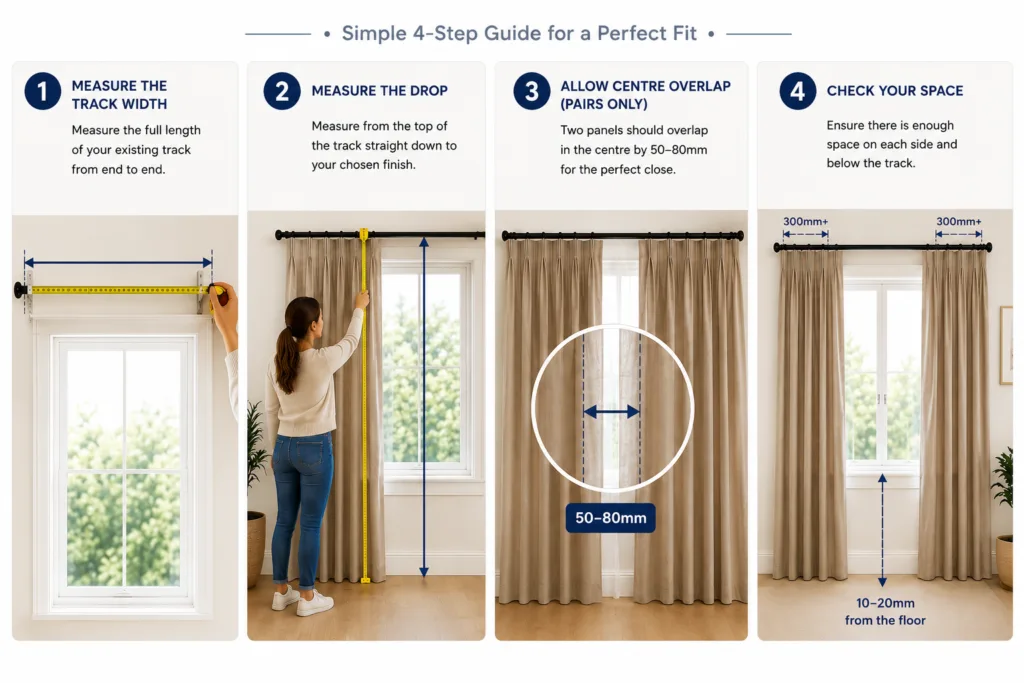
Step 1 — Measure the Width
You are measuring the length of your track or rod — not the window glass.
If Your Track or Rod Is Already Installed
- Track: measure end to end in millimetres
- Rod: measure between the inside faces of the finials (the decorative end pieces) — not the overall rod length
If No Track Is Installed Yet
Measure the full window frame width, then add your stack-back allowance on each side.
Standard rule: Add at least 300mm to each side of the window frame (600mm total). This gives the fabric room to stack completely clear of the glass when the curtains are open.
Example: a 1,800mm wide window frame becomes a 2,400mm track (1,800 + 300 + 300).
⚠️ For heavier fabrics, thermal linings, or ranch sliders, allow more stack-back room — the thicker the fabric, the more space it needs when open. A blockout-lined pair of curtains on a 2,400mm track may need 350–400mm per side.
Step 2 — Measure the Drop (Length)
Always measure from the top of your existing track — or from the underside of a rod — straight down to your chosen finish point. Measure on both sides of the window and use the longer figure; NZ floors and sills are rarely perfectly level.
There are four standard ways to finish curtain hems in NZ homes:
Option 1 — Below the Sill
If the window sits above furniture, a heater, or a bench, finish the hem 150–200mm below the windowsill. This prevents light gaps at the bottom while avoiding contact with the obstruction below.
Option 2 — Floating Above the Floor
Deduct 10–15mm from the floor measurement so the hem clears the floor cleanly without touching. This is the most practical finish for high-traffic rooms and works well with hard floors and carpet alike.
Option 3 — Skimming the Floor
Measure to the exact floor level. The hem will barely brush the surface — a clean, tailored look. Best on flat, smooth floors where the hem will not catch.
Option 4 — Pooling on the Floor
Add 50–200mm to the floor measurement for a romantic, dramatic puddle of fabric. Adds excellent draught insulation at floor level.
💡 NZ homes with polished timber or tiled floors: pooling looks beautiful but catches dust quickly. In homes with underfloor heating, it can also reduce efficiency near the window. Consider the practical trade-off before choosing this finish.
Step 3 — Understand Fullness (How Much Fabric You Need)
When you order custom curtains, you provide your track width and drop. The maker then calculates the total fabric needed based on your chosen heading style — this is called fullness.
Fullness is expressed as a multiplier of your track width. A 2× fullness on a 2,400mm track means 4,800mm of fabric is used — giving the curtain its drape and body.
| Curtain Style | Fabric Required | Stack Width | Visual Effect |
| Pinch Pleat | 2× track width | Compact | Clean, structured folds — popular in NZ homes |
| Pencil Pleat | 2–2.5× track width | Moderate | Rich, full, traditional gather |
| S-Fold / Wave | 2× track width | Moderate | Soft, continuous ripple — modern and relaxed |
| Triple Pleat | 2–2.5× track width | Full | Formal, highly structured, luxurious look |
💡 If you are ordering made-to-measure curtains from Gorgeous Curtains, you only need to provide your track width and drop. We calculate fullness for you based on your chosen heading style.
Step 4 — Allow for Centre Overlap (Pairs Only)
When ordering a pair of curtains, the two panels need to overlap where they meet in the centre — otherwise you will have a visible light gap and a privacy issue.
This overlap is typically 50–80mm (25–40mm per panel). When ordering from a custom maker, this is calculated and built into the cut width automatically based on your track measurement. You do not need to add it manually — just provide the full track width.
Single Curtains
If you are using a single curtain panel (side-draw), there is no centre overlap to calculate. However, ensure your track extends far enough on the stacking side so the fabric clears the glass completely when open — otherwise you block light even with the curtain ‘open’.
Centre-Draw vs Side-Draw Tracks
- Centre-draw tracks — two panels meet in the middle and draw outward. Each panel needs equal stack-back space on each side.
- Side-draw tracks — one or two panels draw to a single side. Ensure the stacking side has sufficient clearance.
Common Measuring Mistakes — and How to Avoid Them
These are the errors we see most often when clients measure their own windows before a consultation:
| Common Mistake | What to Do Instead |
| Measuring the glass only | Always measure the full track or rod length — not just the visible window pane |
| No stack-back allowance | Add at least 300mm per side (600mm total) beyond the window frame |
| Assuming all windows match | Measure every window individually — even in the same room |
| S-Fold and Pencil Pleat confused | S-Fold needs exactly 2× fabric; Pencil Pleat needs 2–2.5×. Mixing these up is costly |
| Ordering before confirming drop | Decide your hem finish (floating/skimming/puddling) before placing any order |
| Measuring once | Always measure twice. A 10mm error in width can mean a visible gap or excess bunching |
Skip the Guesswork — Book a Free Measure in Auckland
If you would rather have it done properly the first time, our team at Gorgeous Curtains offers free in-home measuring and consultation services across Auckland. Kevin visits your home, takes precise measurements of every window, and provides a clear itemised quote — at no cost and no obligation.